Solution Deployment
![]()
Deploying your solution
Now that we have some entities defined, with attributes, metrics, resource mappings, associations, and entity priorities, we want to validate, deploy, and then check the deployment status of our solution, before we send MELT data to it.
If there is a problem with our solution definition, we can catch it early on before we start creating the user experience for it. That way if we do encounter issues seen in the UI, we will know we’ve verified the persistence of our MELT signals to isolate the cause of any issue at this point.
When developing your solution, you will need to tag it with a “–tag dev” when validating, pushing, and getting the status of your solution.
![]()
Validate your solution
Use the commands below to perform basic validation of the solution.
| fsoc command to validate your solution. | |
| Command Format: | fsoc solution validate –-tag=dev |
| Command Help: | fsoc solution validate -h |
Windows Example Commands:
cd C:\fsoc_projects\my_tenant\ugottaride

fsoc solution validate --tag dev
Unix-Mac Example Commands:
cd /fsoc_projects/my_tenant/ugottaride

fsoc solution validate --tag dev

![]()
Push your solution
When pushing / deploying your solution for the first time, use the commands below.
| fsoc command to push your solution. | |
| Command Format: | fsoc solution push -–tag dev |
| Command Help: | fsoc solution push -h |
Windows Example Commands:
cd C:\fsoc_projects\my_tenant\ugottaride

fsoc solution push --tag dev
Unix-Mac Example Commands:
cd /fsoc_projects/my_tenant/ugottaride

fsoc solution push --tag dev

![]()
Push solution with bump option
When pushing / deploying your solution after the very first time, you should use the commands below to allow fsoc to automatically increment the version number in your manifest.json file for you.
Windows Example Commands:
cd C:\fsoc_projects\my_tenant\ugottaride

fsoc solution push --bump --tag dev
Unix-Mac Example Commands:
cd /fsoc_projects/my_tenant/ugottaride

fsoc solution push --bump --tag dev
![]()
Check solution status
While the fsoc solution validate command we used before we pushed / deployed our solution provided some basic validation, it does not catch every potential issue with our solution.
In order to ensure our solution push / deployment was successful, we will use the fsoc solution status command.
| fsoc command to push your solution. | |
| Command Format: | fsoc solution status <solution_name> –-tag dev |
| Command Help: | fsoc solution status -h |
Windows Example Commands:
cd C:\fsoc_projects\my_tenant\ugottaride

fsoc solution status ugottaride --tag dev
Unix-Mac Example Commands:
cd /fsoc_projects/my_tenant/ugottaride

fsoc solution status ugottaride --tag dev
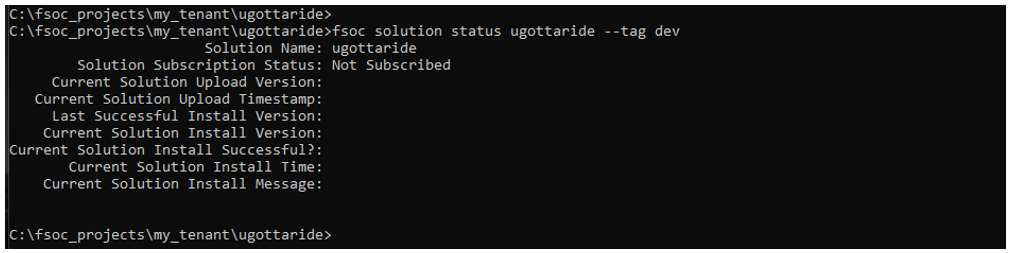
Dev Tip You should always check the status of your solution after you push / deploy it to ensure there were no issues installing it.
The very first time you push / deploy your solution, you will not be subscribed to it and hence you will see that reflected in the output of the fsoc solution status command. Now we need to subscribe to our deployed solution in the next section.
![]()
Subscribe to your solution
While the fsoc solution validate command we used before we pushed / deployed our solution provided some basic validation, it does not catch every potential issue with our solution.
| fsoc command to subscribe to your solution. | |
| Command Format: | fsoc solution subscribe <solution_name> |
| Command Help: | fsoc solution subscribe -h |
Windows Example Commands:
cd C:\fsoc_projects\my_tenant\ugottaride

fsoc solution subscribe ugottaride
Unix-Mac Example Commands:
cd /fsoc_projects/my_tenant/ugottaride

fsoc solution subscribe ugottaride

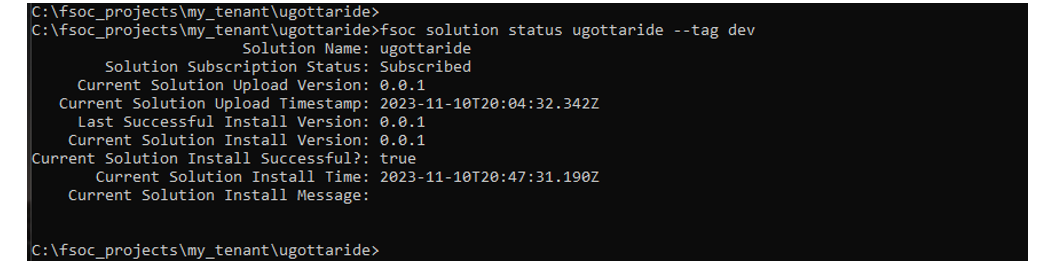
Now check the status of your solution after you subscribe.
Windows Example Commands:
cd C:\fsoc_projects\my_tenant\ugottaride

fsoc solution status ugottaride --tag dev
Unix-Mac Example Commands:
cd /fsoc_projects/my_tenant/ugottaride

fsoc solution status ugottaride --tag dev
The status of a successful solution installation should look like the output below where you see that you are subscribed, and have the same version number for the current upload version, the last install version and the current install version, with no errors in the install message.
![]()
Next Steps
We’ll generate and push some mock MELT data.